Or how service to service communication can make use of JWT-tokens issued and validated by Azure Active Directory.
When setting up API’s often the most difficult part about it, is making them secure but easily configurable.
Since we don’t want to be modifying the configuration of our API Management policy every time a new partner wants to connect, there is a way to leverage Azure Active Directory application roles for this, providing a manner for you to allow API-access based on these roles.
By using the setup described below, you will be able to define both authentication and authorization using a single JWT-token generated by the Azure AD Identity Provider.
Steps
- Create Service App Registration
- Create Client App Registration
- Generate JWT-token
- Add Application Roles
- Re-generate JWT-token
- APIM Policy to validate JWT
Overview
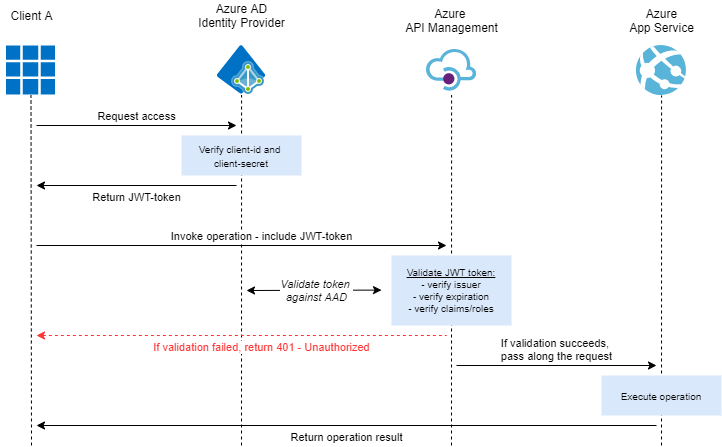
Before we get started, let’s give an overview of how everything will be connected, while making use of OAuth2.0 in combination with the AAD Identity.
Because an image says more than a thousand words, have a look at the diagram added underneath and consider the fact that in this case we are going to expose a backend API, through Azure API Management. While we want the API to be secure, we don’t want to add any additional complexity to the API itself, which is why authentication/authorization is going to be handled by API Management which can easily be updated later.
Create Service App Registration
The first requirement, as part of this setup, is the creation of an app registration for our API Management service within Active Directory.
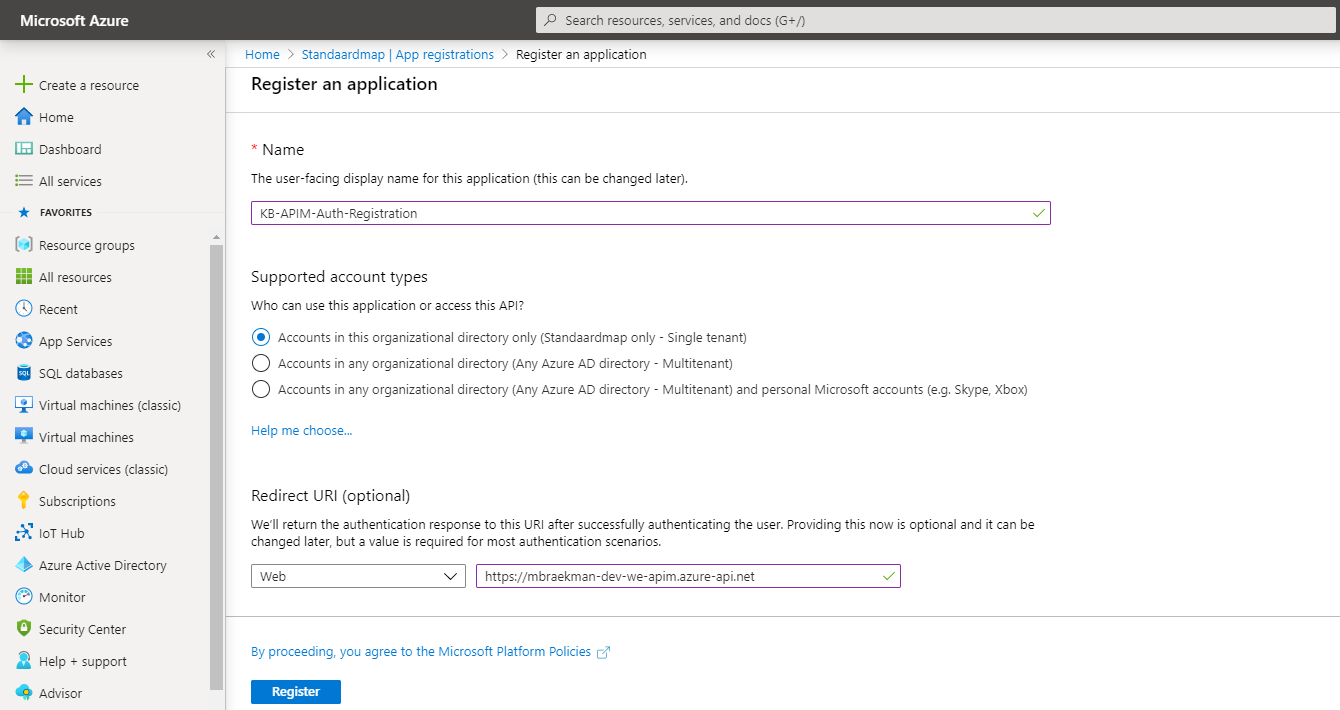
In order to do this, open the Azure Portal and navigate down to Azure Active Directory > App registrations and click the ‘New registration’ button.

Make sure to provide an easily recognizable name - which follows your team’s naming conventions of course - and ensure to restrict access to the default directory only.
While it isn’t needed for this particular setup, you could also specify a redirect URL.
Once created, you will get redirected to the newly created app registration, offering you an overview of the features and different ids. But what happens when you create a new app registration?
Well, behind the scenes Azure is in fact creating 2 objects in Azure AD (as you can read over here as well):
- Application Object: defines the characteristics of your application (whether it is as client or server). This object only resides within the Azure AD tenant where it was registered.
- Service Principal Object: defines the access policy and permissions of the application in an Azure AD tenant. A Service Principal exists for each AD tenant where the application is used. Currently we don’t need to access or modify anything to this.

The next step it to ensure that version 2.0 is being used of Azure AD OAuth, click to the Manifest-tab, track down the accessTokenAcceptedVersion-property and update the value from null to 2, before clicking Save.

Once that is done, we need to make sure that clients can request a JWT-token specifically for this service. To achieve this, we need to set the “Application ID URI”, which will be used in the scope-property defined in the actual JWT-token request.
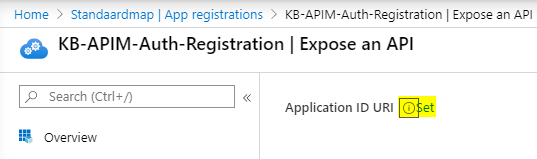
To set this Uri, navigate back to the overview page of the service app registration and click on the link “Add an Application ID URI” on the right.

This will take you to “Expose an API“-tab, where you need to click “Set” at the top of the screen.
Once clicked, you will be given a default URI, which will consist of “api://{ApplicationID}”, but this can be set to any valid URI of course. In this case, we’ll go for the gateway URL of our API Management service.

Create Client App Registration
Now that the app registration has been created for our “server“-application, we need to create another app registration for our client, which could either be a partner or a single team from that partner.
In order to create the client app registration, again navigate the Azure Active Directory > App Registrations > New registration.

While last time, for the service app registration, we could ignore the ID’s that were shown, for this registration make sure to copy the Application ID as this will be the Client ID to be shared with your partner.

Next step in the process is to generate a client secret which can be used by your partner to authenticate against the AAD Identity Provider to obtain a JWT-token.
This can be done by navigating down to Certificates & secrets and clicking the New client certificate-button.
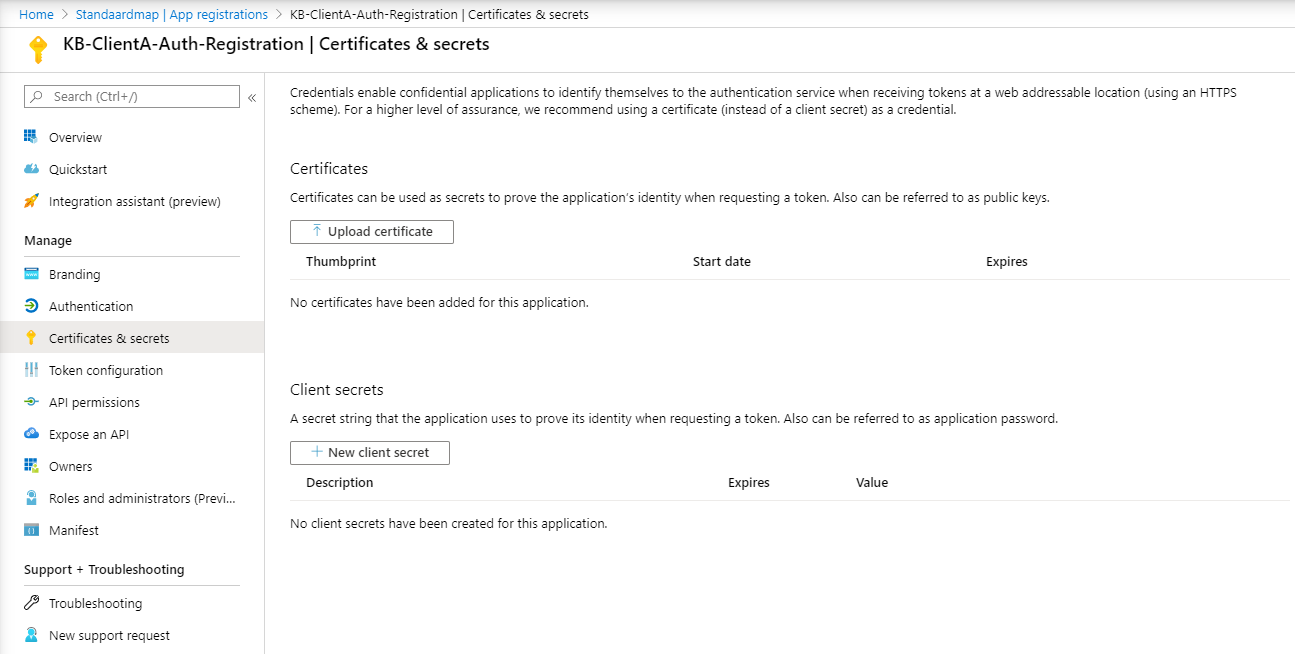
In this case I’m going to create a never-expiring secret, depending on the policies that are in place within your team or company this could be reduced to either 1 or 2 years.

Note: Currently there isn’t any support for active directory-events related to these secrets, so currently, unless you’re scheduling a PowerShell-query to identify (near-)expiring secrets, you’ll have to keep track of this expiration date in some other way.
Once the client secret has been generated, ensure to store a copy in your password-manager, since you will no longer be able to retrieve this value from the Azure portal.

Generate JWT-token
At this moment you have enough information to provide to the client - for whom the app registration has been created - to ensure they can authenticate against the Azure AD Identity Provider.
But exactly what information do you share with that client?
Azure AD OAuth v2.0 token-endpoint
The first thing to share would be the actual URL to reach the identity provider. Without this, no point in sharing any credentials of course.
https://login.microsoftonline.com/{tenant-ID}/oauth2/v2.0/token
In order to ensure you are providing the correct URL, you can retrieve this value from within your Azure Active Directory by navigating to App Registrations and clicking on Endpoints at the top of the screen.

You’ll see a new slide out providing an entire list of endpoints that have been made available to you. However, since in this case we chose to go for v2.0 of OAuth, make sure to copy the v2 token endpoint URL.
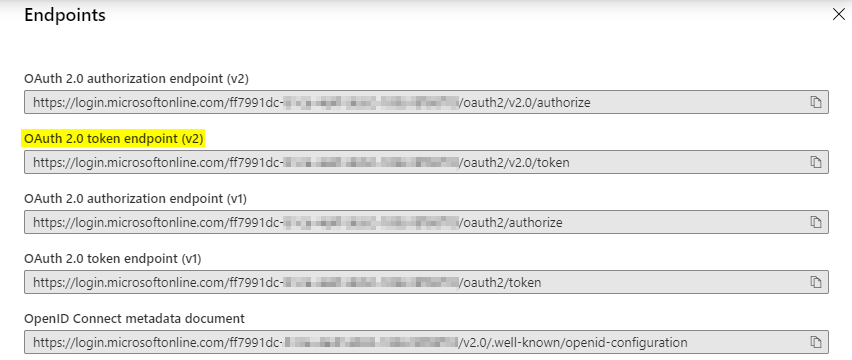
Note: also notice that this list contains the OpenID Connect endpoint, which will come in play in the next part, where we are going to validate the received JWT-token.
Client Credentials
Next in line are the client credentials required to authenticate and request a new JWT-token.
These values should’ve been copied, as these are:
- Client ID:
The application ID of the client app registration.
In this case that would be: 828804d9-ee9b-482f-b1d1-3ffd100bd15b - Client Secret:
The client secret generated for the client app registration.
In this case that would be: 2B~ba-5Q0l-XXXXXXXXXXXXXXXXXXXXXXX
Request build-up
Next thing to explain is what headers to add and how the body should be structured.
As far as the headers go, there is only 1 thing to specify and that is the Content-Type:
Content-Type: application/x-www-form-urlencoded
The body consists of the client-credentials, the grant-type indicating what type of authentication-method is used and the scope used to specify for what specific service the JWT-token is to be generated.
This scope is the value we set earlier as the Application ID URI of the service App Registration followed by ‘/.default’ and URL-encoded.
client_id=828804d9-ee9b-482f-b1d1-3ffd100bd15b&scope=https%3A%2F%2Fmbraekman-dev-we-apim.azure-api.net%2F.default&client_secret=2B~ba-5Q0l-XXXXXXXXXXXXXXXXXXXXXXX&grant_type=client_credentials
Throwing all of this in a tool such as Postman, would look like this:


When executing the POST operation, a token matching the following structure is being returned:
{
    "token_type": "Bearer",
    "expires_in": 3599,
    "ext_expires_in": 3599,
    "access_token": "eyJ0eXAiOiJKV1QiLCJhbGciOiJSUzI1NiIsImtpZCI6IkN0VHVoTUptRDVNN0RMZHpEMnYyeDNRS1NSWSJ9.eyJhdWQiOiIzNzg1YThmMC1hMDUxLTRiZWYtOGQ3Yy1mYTVkODU5ZDdkMmQiLCJpc3MiOiJodHRwczovL2xvZ2luLm1pY3Jvc29mdxxxxxxxxxxxxxxxxxxxxxxiI2Nzg3N2I1Ny02MDFmLTQyM2ItYjVlOS03NzM1NDhmMzc5NDkiLCJyb2xlcyI6WyJrYi1iYWNrZW5kLWFwaXMuYWxsIl0sInN1YiI6IjY3ODc3YjU3LTYwMWYtNDIzYi1iNWU5LTc3MzU0OGYzNzk0OSIsInRpZCI6ImZmNzk5MWRjLWIxY2UtNGU0Zi1hYjYyLTE4OWExOGY2OGYxMCIsInV0aSI6IkkycThyd091RFVHZUM2RXZhdmduQUEiLCJ2ZXIiOiIyLjAifQ.0xb-3CGpucavYgQHLpKk3ZdvVxYzJki4LMzjyfDbPCcm65RzE1hw1XFFs8-HJ8x-VoshgOwiXyxJEmCfvAu9W-5e9hj_NaVNQcaMNLDo88dLfoxR3vIlXD_yKblbdzYD08w5FTc_wUwu0Cy8mtrnUOraMv3tWYPkz6mho0MWcqc2TybtTPaXL0g63sIAdbepPfe_mCMxtuJFnKKqWeu9HZcnSVN7L7s6qEU4s1_GoL2PIc3yYT17qETn_TS1oVIPQkswWs_FTU3FxAcSqVWUI3G7Xxadzz1x67Dn3EA9bzuqbYfPMTvOHtzKRo3JO2rDG8hBEsr1-Nnj4J5_Mxrthw"
}
While this token seems to be quite cryptic, it is actually a signed base64-encoded JSON-structure, which can easily be decoded using jwt.ms and will result into the following structure:
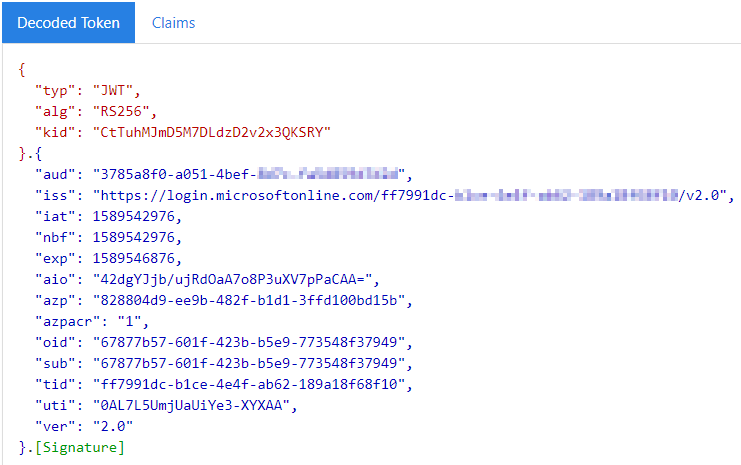
Note: notice how the client application id is present in the azp-claim, making it possible to identify who is making the call.
While it is useful to have the azp-claim available in the token, this would still mean that within your API Management-layer, you’ll need to make changes every time an additional client needs to be hooked up, making this quite a hassle. Fortunately, that is where application roles can help us out.
Add Application Roles
Application roles allow you to define specific roles within the service app registration, which in turn can be granted as a permission to any client app registration. As a result, this means that each client can get multiple roles assigned, allowing us to use these roles for authorization.
To assign an application role to the service app registration, go back to the Azure Portal > Azure Active Directory > App Registrations > Service App Registration > Manifest and locate the appRoles-node.
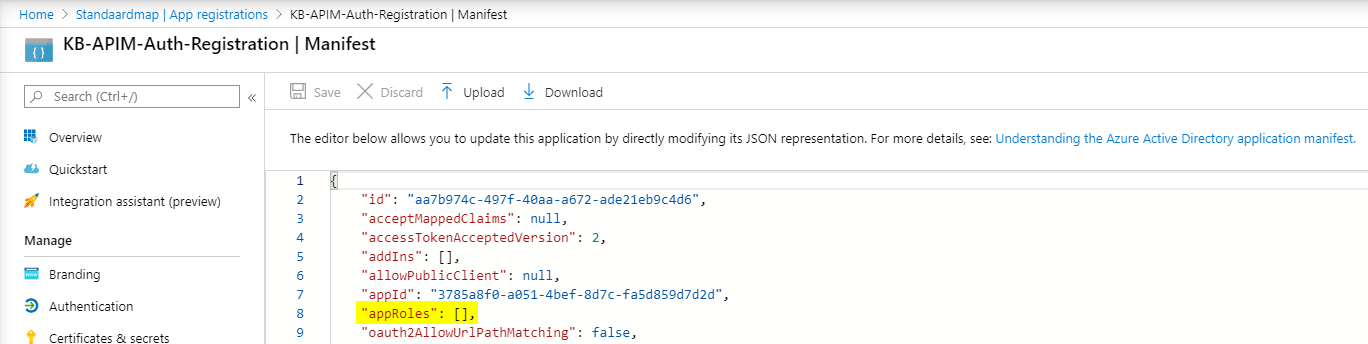
Add the following JSON-structure to the array to create and enable the application role for this app registration.
"appRoles": [
{
"allowedMemberTypes": [
"Application"
],
"description": "Members can consume all KnowledgeBase APIs.",
"displayName": "KB-Full-Access",
"id": "fcbdf245-afd4-4fdd-8d29-f9e913050f3f",
"isEnabled": true,
"lang": null,
"origin": "Application",
"value": "kb-backend-apis.all"
}
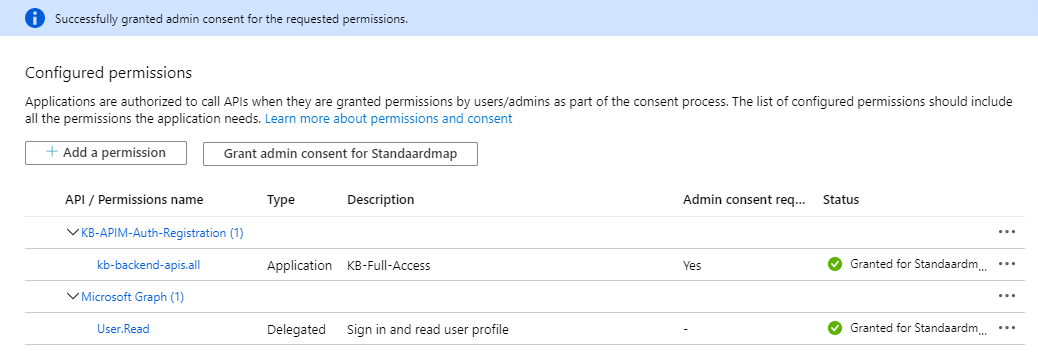
]Once the updated manifest has been saved, the application role is being registered but the client app registration still needs to get linked to this role. To do that, go to the App Registrations > Client App Registration > API Permissions and click ‘add a permission’.

Within the slide out, look for a permission with the same name as the value granted within the value-property of the earlier created application role and add this as a permission.
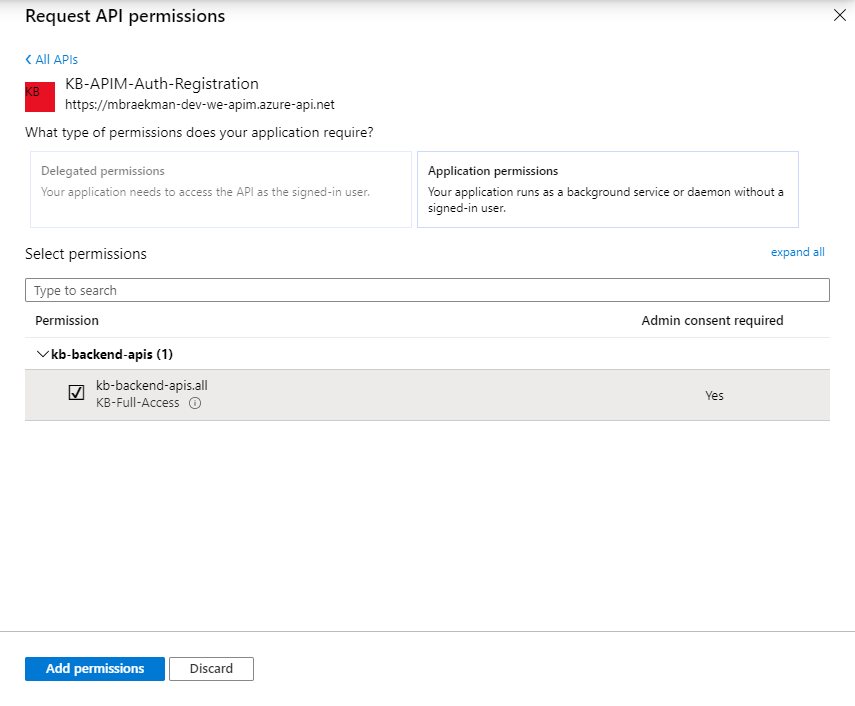
This action has added the permission onto the client app registration, but still does not allow it to make use of it, or include it within any token, you still need to grant admin consent by clicking the button above the permissions-overview.
Now, the app registration should be all set to make use of the application role, which means the JWT-token should look a bit different compared to earlier.
Re-generate JWT-token
Let’s try executing the same POST operation in Postman to request a new JWT-token from the Azure AD Identity Provider.
{
    "token_type": "Bearer",
    "expires_in": 3599,
    "ext_expires_in": 3599,
    "access_token": "eyJ0eXAiOiJKV1QiLCJhbGciOiJSUzI1NiIsImtpZCI6IkN0VHVoTUptRDVNN0RMZHpEMnYyeDNRS1NSWSJ9.eyJhdWQiOiIzNzg1YThmMC1hMDUxLTRiZWYtOGQ3Yy1mYTVkODU5ZDdkMmQiLCJpc3MiOiJodHRwczovL2xvZ2luLm1pY3Jvc29mdG9ubGluZS5jb20vZmY3OTkxZGMtYjFjZS00ZTRmLWFiNjItMTg5YTE4ZjY4ZjEwL3YyLjAiLCJpYXQiOjE1ODk1xxxxxxxxxxxxxxxxxxxxxxxxxx2xlcyI6WyJrYi1iYWNrZW5kLWFwaXMuYWxsIl0sInN1YiI6IjY3ODc3YjU3LTYwMWYtNDIzYi1iNWU5LTc3MzU0OGYzNzk0OSIsInRpZCI6ImZmNzk5MWRjLWIxY2UtNGU0Zi1hYjYyLTE4OWExOGY2OGYxMCIsInV0aSI6ImlwWTJxNjRqVDA2WlNtamNNaVpKQUEiLCJ2ZXIiOiIyLjAifQ.HlTGdVdOIxXQSHBkfMFUv705APX-G98IoLVVT8BgqEmNty9NysVMMclRH0niyqM9CFPeqroNo5DiT8LoE_ln4HZfPpwqCqtA2AYQRxyq8PZDzQ5iG7-nfRma3klkS_zxEK_P186wBrHtFZysPdXILBZhF29phxCYQcXnT1kXsXJATtZqHpTCqAT49UQEuEOSOsnT1zQDy2fA7qlNCj9lsT1sO-4IVmkcppIGGZrR9BSJsJxiaO4SzymKWzU2-368wXmc0N7zp9OEUEBkdqczijeUh5Ogq5yOOwK4T3U8ZGDBG3NeLVCMFZ5SwB-1UdWd2HDa3YJUJF0oKyjXkC0YGg"
}
At first glance, the returned token looks the same as before, right?
Let’s decode the token again and see what that looks like:
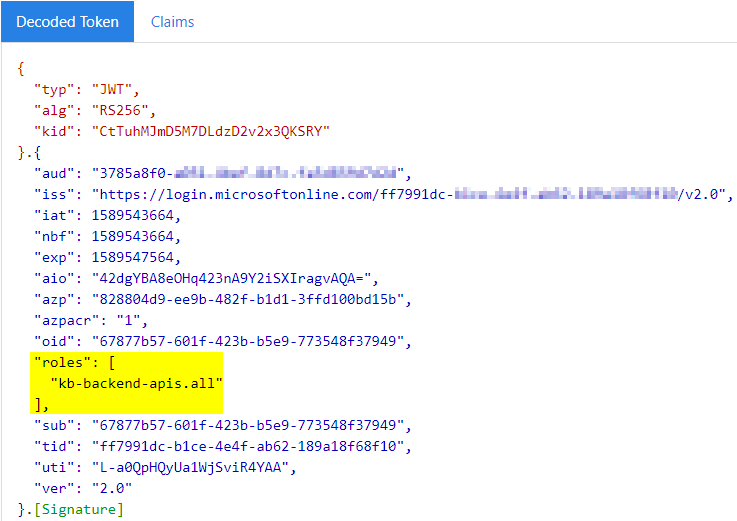
The token actually contains the name(s) of the assigned application role(s), which means that within API Management we can now verify the roles-claim to define which client is authorized to invoke any operation on the API, or even take it a bit further and define which client can invoke which operation within a single API.
APIM Policy to validate JWT
Now that we are able to assign roles to app registrations and make sure these are added into the JWT-token, we can use this information to take care of the authorization from within our API Management.
To do this, we can make use of the validate-jwt-policy.
Consider applying below configuration as a base-policy, meaning it will apply to all operations of this specific API.
Want to take it even further? Why not add this policy onto a product and make is very easy to apply to multiple API’s.
<policies>
    <inbound>
        <base />
        <!-- validate the JWT-token and verify whether the the required role has been assigned. -->
        <validate-jwt header-name="Authorization" failed-validation-httpcode="401" failed-validation-error-message="Unauthorized" require-expiration-time="true" require-scheme="Bearer" require-signed-tokens="true">
            <!-- specify the OpenID Connect URL specific to your tenant. -->
            <openid-config url="https://login.microsoftonline.com/{tenant-ID}/v2.0/.well-known/openid-configuration" />
            <required-claims>
                <!-- specify 'any' to be able to add multiple roles. -->
                <claim name="roles" match="any">
                    <!-- the value should match the name assigned to the appRole. -->
                    <value>kb-backend-apis.all</value>
                </claim>
            </required-claims>
        </validate-jwt>
    </inbound>
    <backend>
        <base />
    </backend>
    <outbound>
        <base />
    </outbound>
    <on-error>
        <base />
    </on-error>
</policies>
As mentioned before, the OpenID Connect URL can be located within the Azure Active Directory > App Registrations > Endpoints-overview.
While in the claims verification, we can easily add multiple roles by simply specifying the name of each of the application roles we want to grant access.
Simple, right?!
Conclusion
Making use of Azure AD and OAuth2.0 provides a very simple way of allowing new clients to interact with our API as we can simply register a new app registration in Azure AD, assign the appropriate application roles and we are all set. The only thing left would be to provide the client-id and client-secret, along with the required URL’s to our new partner.
Currently, as a first step in the process, all our clients would still be communicating directly with our AD Identity Provider. Of course, this isn’t ideal, as they will be aware of what type of technology is behind our setup, which might make it vulnerable to attacks.
Keep posted for a next addition, which will talk about hiding the identity provider behind APIM as well.